A couple more close ups from last week because I finally wore this Lakshmi Kemp set from @aarvee.chennai that I bought three years ago. I have missed so many weddings, family events and just being with loved ones and the bustle of dressing up for an event, helping my ma and chitthis and perimas with their saree pleats, changing the accessories half a dozen times, kindly rejecting a suggestion, carefully drinking a hot coffee, sitting down with care for breakfast so the sarees pleats don’t get creased even before the event and photos, opening up the bindi store, convincing someone they look really good in something new, getting heady amidst half a dozen perfumes that circulate in the room amidst the flowers, waiting for everyone to be done/others waiting for you to be done and the million dollar feeling of walking into the venue and endless chatter. I miss all these little moments so much. Somedays I cannot wait to reach a stage when I can take a flight and go do all this and come back.
Hope is the hat rack I hang my dreams upon, indeed.
Somewhere this weekend, I spent some time in this saree that I want write about here (I have to give full credit to K’s endurance and creativity in capturing some really lovely moments).
You see, it was the first saree that ma and I purchased for me. Up until then, I was always whisking ma’s sarees for weddings, college events, everything. I used to stitch a blouse for myself because the kinds I would wear were never ma’s style but the sarees were all hers. When one of my favourite cousin’s wedding was fixed, I decided to buy a saree for the muhurtam and ma and I found this in the first shop we went to. I got an extremely elaborate blouse stictched for this with beads and ties and everything and I may have been as excited as the bride herself for this wedding day. I have a thing for white and cream sarees that have silver and gold in them. They are so regal and I love how they look on everyone I have seen them on. I have such grand memories of the few of us singing “Sita kalyanam” and “Malai maathinal” and “Unjal aaDinaal” in all our jasmine, gold and saree clad glory amidst that sound that new sarees make if you listen. I remember so many moments from that wedding in such vividity and the saree is always such a big part of it. I even wore this as part of one of the smaller events in my wedding. I know not much about weaves and the saree continues to be a small part of my life even if it means just wearing it for myself on a random day for a few hours. It is perhaps the way it makes me feel, or takes me back or maybe just part of who I am. It is not one to dissect for today but I love this love and someday maybe I will have a slightly more academic interest in it or maybe not. But I know that when I drape a saree and sip a coffee, I will be comforted in a strange way that only makes sense to me.
When we started growing our own, we started with an expectation (and mostly hope) it would account for a small portion of weekly veg intake. We have been blown away by how misplaced we were. And that is saying something because home gardening is not so much about meeting your produce demands as much as as it is about nurturing and experiencing the joy of growing and eventually savouring. Ofcourse, the last step of the journey is important and especially more so when you are a beginner. We are. Because, if we ran too much before we could walk, it could in many ways influence how we saw this whole exercise. Trust me, I started with a fair few losses and this has been nothing but overwhelmingly encouraging. The key is to not let an attempt define your next. It is hard but it is true.
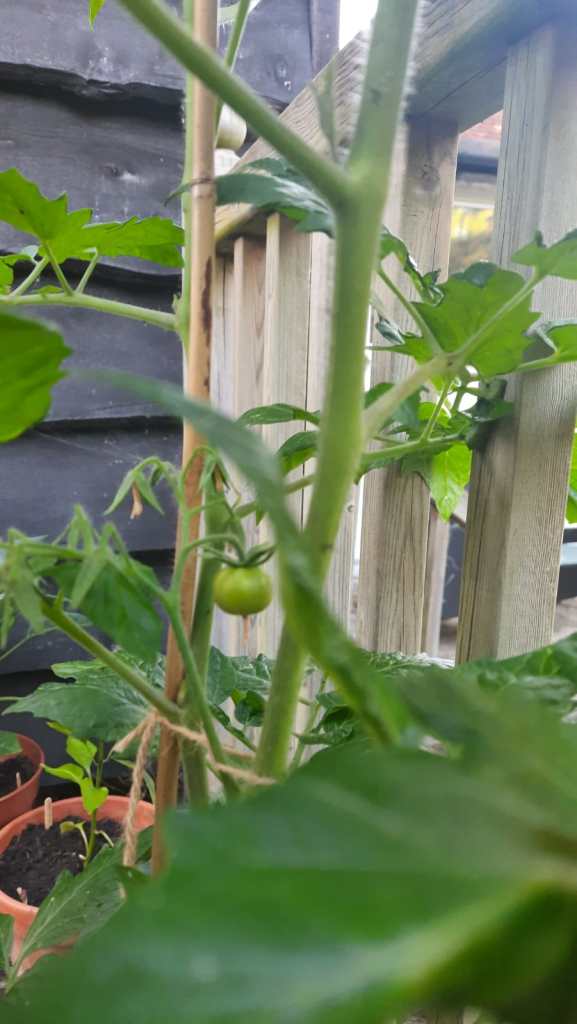
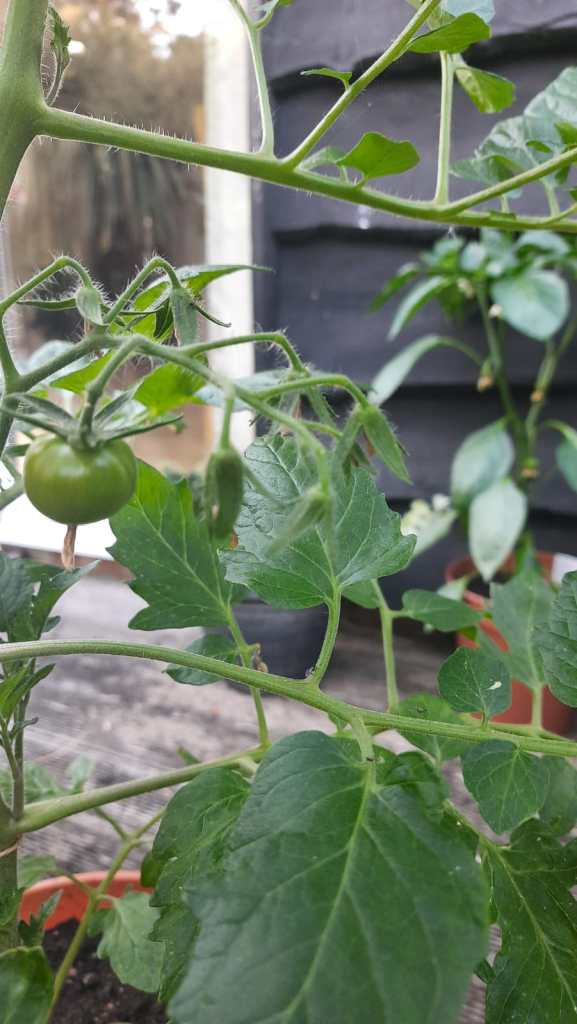
Five days back we started seeing blight on some our tomato plants. Ofcourse I had not used any resistant variety (determined to not use anything that was modified or made of chemicals) and the only feed I used was compost and some manure. While I am not surprised about blight hitting my tomatoes, I am taken by how quickly they consumed my babies. The plants in modest pots and bags gave us a lot, a lot. But regardless of the yield, I had developed a strong love for them and to see them go I front of our eyes has been devastating. 4 empty pots stand bare on our portico. The place where I would start my mornings looking for new babies. I distinctly remember seeing the first babies form on the first of our tomato plants. I distinctly remember feeling impatient at how slow they were to grow, a vague fear engulf me as I wondered if they would fall off in the rains and strong winds we went through.
My fears, I can happily look back now, have been allayed over and over again. We have plucked a lot of tomatoes from the beautiful plants.
And a couple of days back, we plucked our last.
Time and again I realize how much I signed up for when I sowed the seeds. And it was never just about the tomatoes. But I will do it all over again. And take better care.
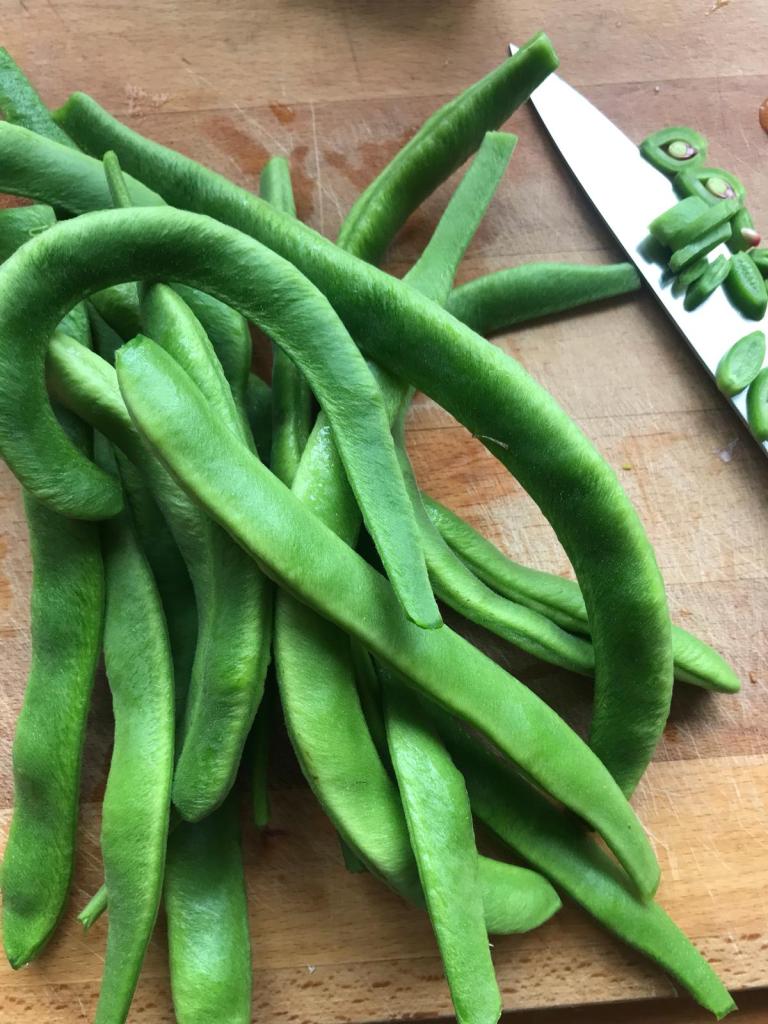
For a long time now, I have tried to grasp the meaning of simple food. You see this plate here ? Rice, tomato rasam, a roast pappad, some palya which by the way is what I made of some of those gorgeous runner beans that our neighbours gave us – this meal is my meal, it is the kind of meal I grew up eating and it was a full meal. I don’t ever remember thinking of this as a simple meal as much as I thought of it as a staple. On the other hand, simple has a sort of a happy connotation to it too bringing up associations with what we now deem to be simpler times. Is today a simpler time of tomorrow? Which kind of leaves me in a dilemna – all the subjectivity around simple apart, what is a simple meal to me, today? Is it my everyday meal? Or a meal that comes together simply? Perhaps a meal with few easily available ingredients? Or is it a meal one can make sustainably, consistently?
But here is what I chose to do as this plate stared at me – dive into my rasam rice with gusto. It did not answer my question. But when the smell of the ghee tempering invades your kitchen, it is best to keep matters simple and enjoy the meal. Simply put, it is as simple as that. But I’d love to know – what is a simple meal to you? Can you define it?
If you are curious, here is how I made this meal.
Runner beans Palya
Our lovely neighbours Da and Ce gave us some of the best runner beans we have had – tender, crisp and absolutely delicious with all the added happiness of having been grown with tonnes of love. Have you even seen the smile that lights up Da’s face as he talks about his love for runner beans?
You need: Runner beans – about 300-400 gm Fresh/ desiccate coconut (fresh is amazing, I used desiccate as that is what I had) – 2 table spoons (or to your liking) Tempering ingredients: 1 tablespoon oil (sunflower or coconut), 1 teaspoon mustard, 1 tsp cumin, a pinch of asafoetida, a couple of dried red chillies torn into rough bits, half a tsp of methi/ fenugreek seeds, 1 tsp urad dal/ channa dal or a mix of both, curry leaves. Turmeric – a pinch. Salt to taste
Method: 1. Chop the runner beans small. 2. Take a wok/ kaDai and bring to heat. Meanwhile keep the tempering ingredients ready. 3. Once hot, add a tablespoon of oil (I used sunflower but coconut oil works great too!) add the mustard, cumin, fenugreek and let them splutter, add the chillies, asafoetida and the curry leaves and sauce for 5-10 seconds. You don’t want to burn them 🙂 4. Add the chopped runner beans, turmeric and give it a good toss, add a bit of salt (to hasten cooking and for the beans to get some of it in) and sprinkle some water, give it a mix and cook on medium heat. You can cook this covered too but just keep checking in between. 5. Once the beans has cooked to a bite (we definitely don’t need them to become mushy!), adjust salt to taste, add the coconut and mix well. Turn off the heat. Your palya is ready!
Quick Tomato Rasam
This has to be one of the easiest ways to make a quick rasam. Ofcourse, this calls for having rasam powder or sambhar powder at hand but it comes together so quickly, so I highly urge you to have some in your pantry. I use the one that ma makes and gives me every time I visit her but you can always use good quality commercially available ones from MTR or GRB or a brand you like. Ofcourse one can go on about the joy of using a powder that is handmade but some of the commercial mixes are not that bad and while it may make a difference in the taste, I still believe that a rasam made with a good quality store-bought rasam mix can still be comforting 🙂 I will never forget the copious amounts of rasam we had during the brief but heavy snowfall that 2020 brought with it here in Surrey. See for yourself.
You need: Tomatoes (preferably sour): 300-400 gms chopped into small chunks Tamarind paste or tamarind water from pulp (skip if your tomatoes are super sour, mine were not so I used tamarind for tanginess): to your preference. I used 2-3 tsp of paste, we do like it quite tangy. Tempering ingredients: 2 tablespoons ghee, 1 teaspoon mustard, 1 tsp cumin, a pinch of asafoetida, a couple of dried red chillies torn into rough bits, curry leaves torn. Corriander leaves torn to small bits – to your preference but highly recommend keeping the stalks. Rasam powder/ molaga poDi/ sambhar poDi – 2 tablespoons (this depends on how spicy you want it to be and the powder you are using ofcourse, use your discretion :)) Salt to taste Water – 2 cups
Method: 1. Heat a deep bottomed vessel. 2. We start with the tempering so add ghee, let it melt and heat up. Then, add mustard, cumin and once they have spluttered, add the torn red chillies, asafoetida and curry leaves. Sauté for a few seconds. 3. Now add the tomatoes and sauce for 3-4 minutes. Let us become slightly soft but not too mushy. 4. Now, add water, tamarind paste and mix well. Bring this to a rolling boil. Once the tomatoes get cooked and the raw smell of the tamarind paste is no longer present, then add the rasam powder/ molaga poDi/ sambhar poDi and keep on boil for 3-4 minutes. 5. Now, add salt to taste and let it simmer for a couple of minutes. 6. Finally, add the torn coriander leaves and stalk, mix well and bring off heat. Your rasam is ready!
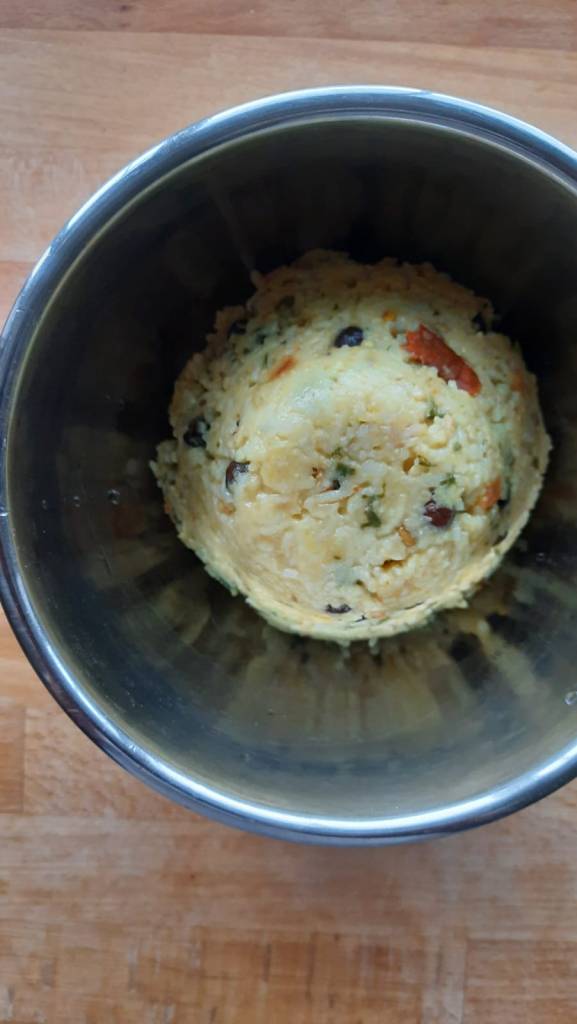
I must start by saying this – we are khichDi lovers here. While I can do with an extremely simple moong dal khichDi sans any vegetables, K loves it when it has some potatoes, chole and garlic. But one thing we always agree on is hot, slightly soupy khichDi that we can devour by bowlfuls regardless of what meal it is.
But here is the thing – when you cook in a famished state, even your poor sense of proportion takes a further hitting which is how I ended up making an entire pot full of khichDi that lasted two servings each for dinner, a serving for breakfast and another generous bowl smirked at us as if daring us to finish it. Now, we are not ones to give up or throw away perfectly normal food (and definitely never khichDi), so this is something I am so proud to have made – a perfectly healthy air-fried khichDi cutlet if you can call it that! I cannot urge you more except to share how I made it and sincerely hope you make some extra khichDi or give this a go when you make something with the consistency of a khichDi like pongal and have leftovers. They sort of remind me of one of my favourite Italian snacks – arancini. Please treat this more as a method/ idea than a recipe to follow to the T.
Here is what you need:
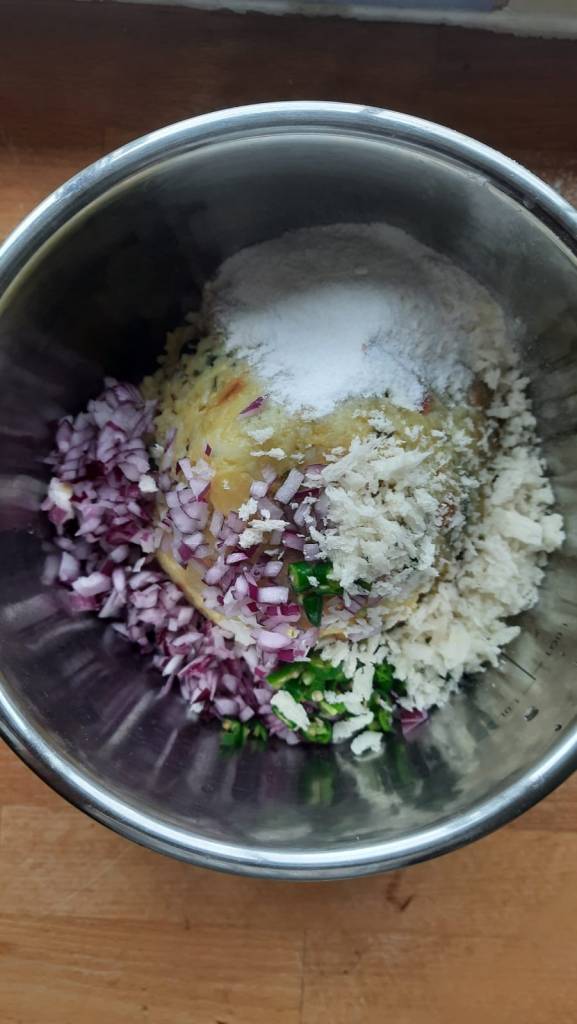
Leftover khichDi – I suggest you keep it in the fridge to let it thicken (if it was soupy to start with and you probably would if they are leftovers anyway) Finely chopped onions (optional) Finely chopped green chillies (optional and to taste) Rice flour – About 1.5 tablespoon (just to make sure your khichDi can come together like a ball and also crisp nicely). Panko bread crumbs – 1 spoon to mix in the khichDi (again for crispiness) and enough to coat the khichDi balls with it. You could perhaps replace with java/semolina/ suji but I have not tried this. Cheese of choice, I used cheddar – cut into small thin strips to place in the centre of the khichDi ball
Method:
Take the khichDi out from the fridge and ideally you want it to be slightly clumpy but if not, we can always add more rice flour in the next step.
2. Now add finely chopped onions, green chillies, rice flour and panko bread crumbs.
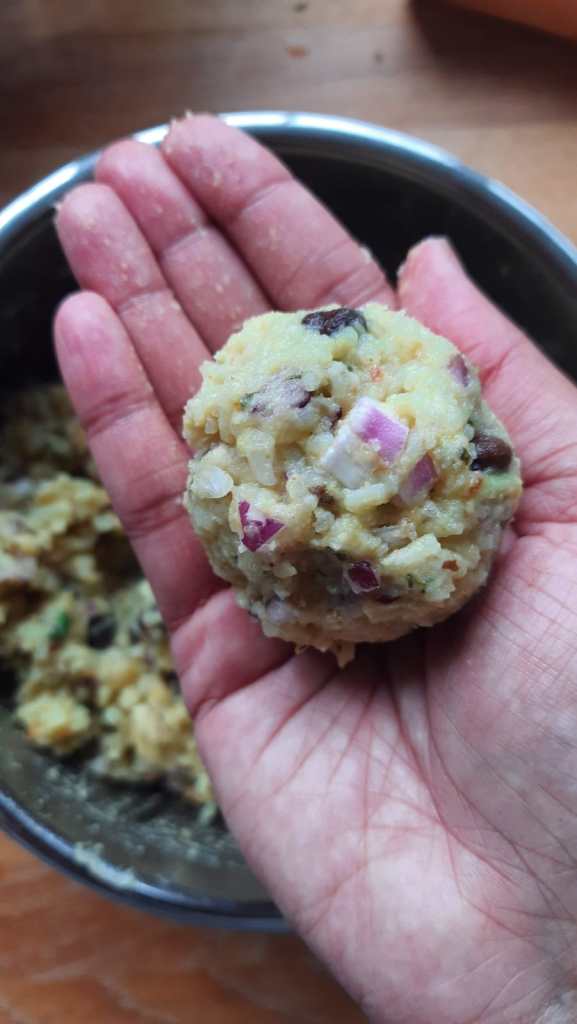
3. Mix it all together and make a ball with it. Add more rice flour if needed so it comes together. It will be a bit sticky and that it totally fine.
4. Make a small dent in the ball and stuff it with a cheese bit and close it.
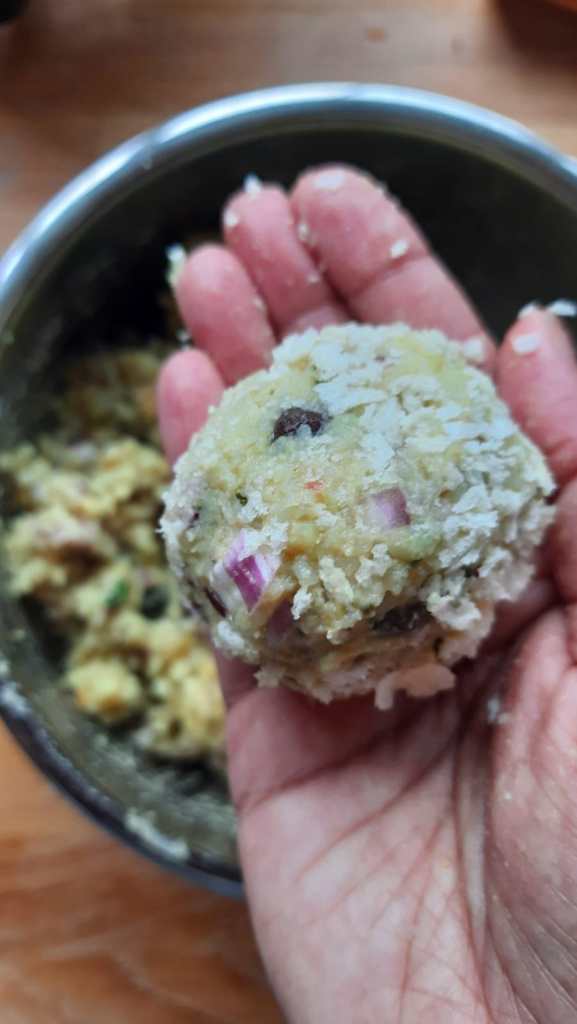
5. Roll this in some bread crumbs to coat it.
6. Roll them all into balls like above.
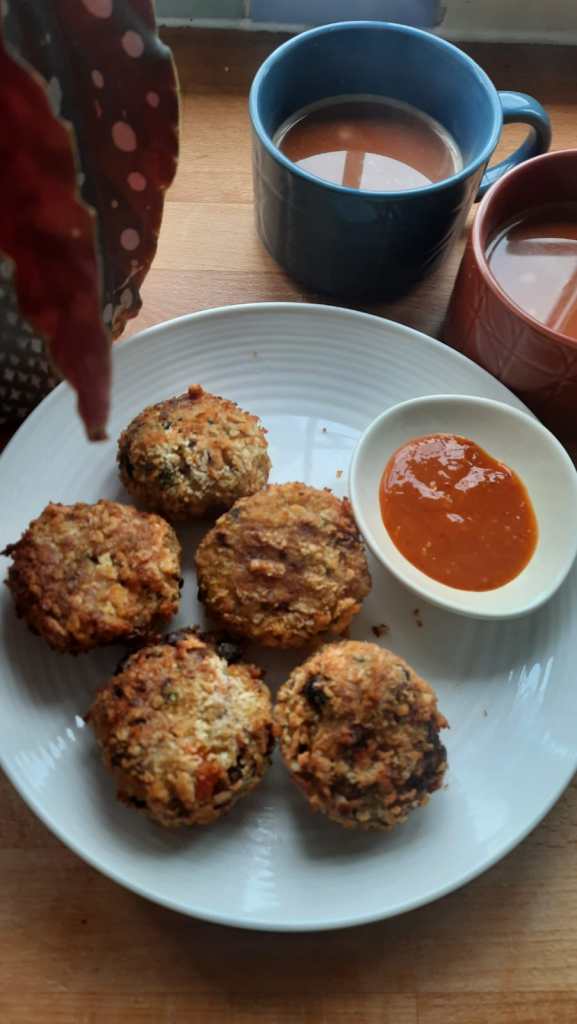
7. Now place them in the air fryer. Brush it with a little oil (but this is not necessary as the balls crisp regardless from how I have tested them). I used Ninja food that has an air crisp function. But any air fryer will do. Set the temperature to 200C and crisp it in 10 minute increments. Check every 10 mins, turning it over. Mine took 25 minutes. If you have made smaller balls they need lesser time, this is something you will know based on your air fryer.
8. That’s all! Serve these gooey centred khichDi cutlets with piping hot chai. We had ours with the absolutely delicious masala chai that K makes.
I have a little video on instagram walking you through the process with the reveal of the crunch and everything!
Other ideas/notes: 1. You can make this with pongal or similar pressure-cooked mixed rice recipes that hold together. 2. Add more veggies, nuts, shredded cheese or stuff with paneer – just anything you like! 3. Coat it with sesame seeds for that flavour or roll it with rava/semolina/ suji for that crispiness instead of bread crumbs.